A Lady Bug Hello

Feb. Sketch H2O

If you’re a follower, then you know I love a Sketch Challenge!

Over at: Crazy4Challenges   Every third Saturday is a sketch challenge!

I am the Hostess for February so this is the sketch I came up with.  I thought it would be pretty easy since you could make it any theme that you want.

The Steps:

Step 1:  Make the card base by choosing an 8.5″ x 11″ piece of cardstock and scoring it at  5.5″  along the long side.  Fold over for a book fold card and trim to  the finished size of 5.5″ x 7″.

Step 2:  I cut a strip of brown cardstock that measures 7″ x 5/8″ and adhered it to the base front 1/2″ from the folded edge of the base card front.  I added the leaves from a discontinued die set from ECD called Curvy Leaves.

Step 3:  The 3 squares are from die cutting the smallest square from: 1118 – Stitched Squares

Step 4:  The lady bugs are an Elizabeth Craft Designs discontinued die set.

Step 5:  The “Hello” sentiment is from: Lawn Fawn

scripty hello

Thanks so much for taking a look.  I know your time is valuable!


Easy All Occasion Card!

Kite Front H2O

This week over at: Crazy4Challenges  I am the hostess, and found on the “Calendar of Days” that today is “Kite Flying” day!  So for this Saturday  Feb. 8th. the challenge is to put a kite on your card.  If you don’t have a kite then you can put anything else that flies on your card.  Or,….You can make a kite to put on your card like I did.

The Steps:

Step 1:  Cut a rectangle that measures 5.5″ x 7″ from white cardstock.  Next I used a stencil from Elizabeth Craft Designs called “Clouds and Grass” to stencil this background panel with PanPastels.

Step 2:  I made the kite by cutting a rectangle from Coral cardstock that measures 2″ x 3″.  Then I folded on the diagonal long side.  Then cut the shape of the kite.  Then fold across the kite.  Below shows the toothpicks I glued on the underside:

Kite under tooth

Step 3:  Cut out a 1″ x 6″  grass edge for the bottom of card with Elizabeth Craft Designs: Nature Edges.  The clouds are from an older Karen Burniston die set called: The All Season Tree.

Step 4:  Make a base card by scoring an 8.5″ x 11″ pc. of cardstock at 5..5″ and then folding for a book fold and trimming to 5″ x 7″.  Now adhere the cloud stenciled layer to the front of the base card.  Adhere the grass edge to the bottom of the card.  Then decide how you want the clouds and Kite.  I added a little foam dot under the clouds and top half of the kite.  Then I added a pc. of white bakers twine to make the kite tail.  Then just cut scraps of colored cardstock in tiny triangles and glued them on either side of the twine.

Kite close up

Step 5:  I chose the stamped sentiment from an older one from Karen Burniston “flying by to say” because I could make a few and stash them for almost any occasion by just adding the appropriate sentiment on the inside.  Thanks so much for taking a quick look:

Kite Front H2O

That’s It!

Other Products Used:

Michael’s Craft Store:  All cardstock

CutterPillarPro

Amazon:  PH Neutral PVA Glue


Cute Wedding Card

You can make anything!

Wedding towels H2O

This week’s challenge over at: Crazy4Challenges is to put a ribbon on it!  So first I want to say this is a challenge that everyone should take because you literally can make any kind, color, and type of card you want!  Just put a ribbon on it.  I decided to make a wedding card. First, because I’m still glowing from attending my first granddaughter’s wedding a few months ago and second because yrs. ago I saw a wedding card on Pinterest with Mr. and Mrs. towels with a bow above the towels.

The Steps:

Step 1:  The card measures 4.75″ x 6″ so score an 11″ x 8.5″ pc. of white cardstock at 5.5″ and fold at the score line for a book fold card.

Step 2:  With white cardstock, cut a rectangle using: 1120 – Stitched Rectangles

2017-07-30 12.38.42

Use the largest die in this set above that measures 4.5″ x 5.75″.

Step 3:  Using Elizabeth Craft Designs: Entwined Hearts  emboss the “stitched rectangle”.  Here’s a close up over the sentiment that shows the embossing.

close uo senti

Step 4:  The ribbon I chose looked like it was stitched on the edges to go along with the stitched rectangle.  I made a bow with about 10 inches of ribbon and then cut the ends leaving enough to tape them under the left side top and bottom edges.  Then adhered this layer to the front of the base card.

Step 5:  On a scrap piece of white cardstock about 4 x 4″,  I stamped the Mr. and Mrs. with clear embossing ink and then used silver metallic embossing powder to make the towels.  I separated the mr. and mrs. by an inch apart so I could cut the two towels using the smallest die in this set by Spellbinders: Card Creator

Step 6: Cut a strip of silver metallic mirror cardstock that measures 2″ x .25″.  Fold the top end of each of the towels but without creasing that fold. (you want the towels to thick and luxurious)

.Back of towels

As you see in the photo above I didn’t glue the towels over this strip so as the bottom edges were even. LOL  So I fixed that with adding shiny little white trim at the end of the towels from a really old set of border stickers from Martha Stewart.

Towels close up

Add a small silver self adhesive ball to each end of the silver strip as seen above.  Adhere the towel rack to the front of the card as shown using a large foam dot on both the top and bottom of both towels a half inch from the stitching as shown.

Step 7:  The sentiment is cut from silver mirror cardstock using Elizabeth Craft Designs: 1050 – Best Wishes

Here’s another quick look:

Wedding towels H2O

That’s It!  I sure appreciate you stopping by!

Other Products Used:

Sizzix Big Shot Plus

CatterPillar Pro

Michael’s Craft Store: Cardtock

Amazon:  Double Sided Clear Adhesive

Walmart:  White ribbon


Make Lemonade!

Lemonade H2O         


This week over at:  Crazy4Challenges  It’s Sketch Week!  I love to be inspired by a good sketch.  I bought this stamp set from It’s Cheaper Than Therapy several years ago. It’s called Lemonade2Drink

Lemonade Stamp set

The Steps:

Step 1:  Stamp the glass and Ice cubes on white cardstock any way you like.  Then cut to 3.5″ x 5″.  Color with Copic Markers.  Cut a rectangle from black cardstock that measures 3.75″ x 5.25″ and adhere the “lemonade glass” to this black mat.

Step 2:  Stamp the full circle “lemon slice” on white cardstock and also color with Copic Markers.  Next cut it out.

Step 3:  Make a base card from a green print cardstock by scoring an 8.5 x 11″ piece at 5.5″ and fold as a book fold.

Step 4: I created the two sentiments in Word on my computer.  Then cut them with my Cutterpillar Pro to 3/4″ wide and left the length at about 4″ until I assembled the card.  I did mark the center with a pencil dot and then manually cut the “fishtail ends”.  I also colored the edges of the sentiment tags with the same Copic marker (Y08)

Step 5:  Next assemble the components onto the front of your base card as shown and then cut the ends of the two “fishtail” sentiments even with the edge of the card.

That’s it!  Don’t you love an easy and quick card?

Thanks so much for taking a look!  I can’t wait to see what you do with this month’s sketch!  Here’s another quick look:

Lemonade H2O

Other Products Used:

Michael’s Craft Store:  All cardstock

PH Neutral PVA Glue


Peel Off Stickers Wreath

Fall wreath H2O

This weeks challenge over at:  Crazy4Challenges is to put a wreath on your card! I decided to make a large wreath from one of my favorite products.  Elizabeth Craft Designs has a product called: Peel Off Stickers The one I used for this card is called Elegant Leaves Sku 2525.

The Steps:

Step 1: Make all the leaves.  First make the glitter paper.  Cut a 6″x6″sq. piece of white cardstock.  Stick this square to a 6″x6″ square of clear double sided adhesive.  Carefully pull the white cardstock without touching the adhesive side.  (I use tweezers)  Now sprinkle with Elizabeth Craft Designs: Silk Microfine Glitter in Warm Diamond 

Next, polish the glitter into the cardstock by rubbing it all over with your finger.  This step is what assures that the glitter gets into all the tiny spaces and it really brings out the glow of the glitter.  Now, using tweezers, peel off the leaves and attach them to the glittery white square.  Color them with Copic Markers and fussy cut out:

Leaves on glitter

Step 2:  Using Elizabeth Craft Designs: 1254 – Entwined Circles  Cut two of the largest die in this set. I used wood look cardstock.entwined.jpgAdhere them together but twist one around so the two layers don’t nest together.  As it turned out, not much of these circles show in the end, but it still gave me the perfect base for these leaves.

Step 3:  Make a base card by cutting a 12″ x 12″ green piece of cardstock in half.  Score one half at 6″.  Fold over for a tent fold card.  Cut a piece of designer cardstock or paper that measures 5.75″ x 5.75″ Square. (I used piece that looks like bricks painted white.) Next Adhere the sandwiched entangled circles, centered onto the card.  Now start arranging the leaves to the circles as shown.

Step 4: I cut the boughs from green cardstock using a die set that I just saw has been discontinued.  However, any greenery die set you have would work or leave this out and just add a bow. I added a shinny green ribbon bow over the green boughs.

Step 5:  The sentiment “Fall” was cut from gold mirror cardstock using Karen Burniston’s: https://karenburniston.com/alphabet/

Alphabet

Here’s another look:


Thanks for stopping by and I hope you’ll join us this week!

Other Products Used:

Sizzix Big Shot Plus

Michael’s Craft Store:  all cardstock

Beacon’s Kids Choice Glue

CutterPillar Pro


Inspired by a Book!

Woodland thanks H2O (2)

This week our Hostess, Francis Byrne, who  is also our team leader, has challenged us to make a card that is inspired by a book.  My card was inspired by Hansel and Gretel.  Why a child’s book you ask.  Well because I always have a book I’m reading, but I don’t read books that easily translate to a cute card.  I read military, or murder and detective mysteries.  Romance novels bore me out of my mind.  They’re too predictable.  For example I think Daniell Steel really only wrote one book.  All the others are the same story only the characters names and occupations are different.  I chose instead a book my mother read to me when I was young and sick.  It was both memorable and terrifying because at the end of our street was where the forest began in Los Alamos, New Mexico.  A lot of my elementary school pals played in that forest but not me!  So this is another easy, peasy card.

The Steps:

Step 1:  The card measures 6 x 4.75″.  Score an 8.5 x 11″ piece of white cardstock at 5.5″.  Fold over for a top fold card.  Cut a mat using the larges die from Elizabeth Craft Designs: 1120 – Stitched Rectangles

2017-07-30 12.38.42

I used a piece of wood look cardstock from Michael’s Craft Store. 

Step 2:  I used a discontinued die set from Karen Burniston when she was with Elizabeth Craft Designs called 914 – Outdoor Edges – 3 die set to cut a trees in the background look.  I cut a 3″ x 5″ rectangle from dark Green Cardstock.  Then used Removable Scotch Tape from Staples to attach the tree edge in this set to the very top of this rectangle and cut the “tree edge”.  Adhere this to the wood look layer.  I attached it with the lower edge of the wood layer just above the “stitch” line.

Step 3:  Cut out all the pieces for all 3 of Karen Burniston’s: https://karenburniston.com/woodland-animals-die-set/

Step 4:  The 5 trees are from a discontinued Karen Burniston set called Evergreen Pivot Card.  However, she re-released this set when she went on her own.  Below is a photo of the new one and the link: https://karenburniston.com/evergreen-pivot-panels/

Evergreen Pivot Panels

Step 5: The sentiment “thanks” is an Elizabeth Craft Designs die: https://www.elizabethcraftdesigns.com/products/thanks-1

I cut it once from yellow cardstock and once with green cardstock.  I glued the yellow over the green offset just a little.

Here’s a photo of all the elements of my card.  I like to get everything ready so I can try different layouts:

Once I like it then I start gluing things in place.  Here’s another quick look.  The sentiment “thanks” on this little forest scene is because I’m going to add it to the top of boxes of homemade brownies and cookies for my town’s Firehouses.  I live in California, 2 hrs. by car east of Yosemite.  Every year there is a fire in one of California’s beautiful forests.  And every year our boys and girls are sent in to relieve the ones up there that are completely exhausted.  Besides our hot dry summer days (it’s supposed to be 102 on Sunday) they carry 80lbs. of equipment on their backs.  One yr. that I delivered a similar package, I arrived just as one of the relief shifts were off their turn and returning back to the fire house.  You can’t imagine what they looked like.  Covered in black and grey ash, and could barely walk.  The shift going out to replace them, picked up their pace to each grab one of their returning house mates, and help them get into the fire house to shower, eat and sleep.  They will all do the same thing the next day…..for days! :

Thanks so much for taking a look!  I sooo appreciate my followers and remember you can ask any question and I will get right back to you!

Other Products Used:

Amazon:  Sookwang Clear double sided adhesive

CutterPillar Prp

Beacons Kids Choice Glue

Sizzix Big Shot Pro


National Sandcastle Day

Front seaside H2O

Inside seaside H2O

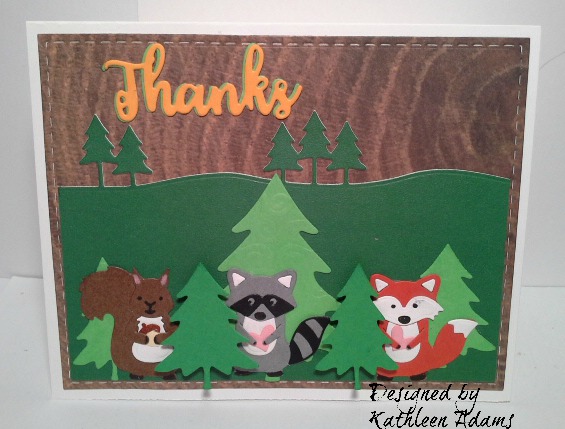
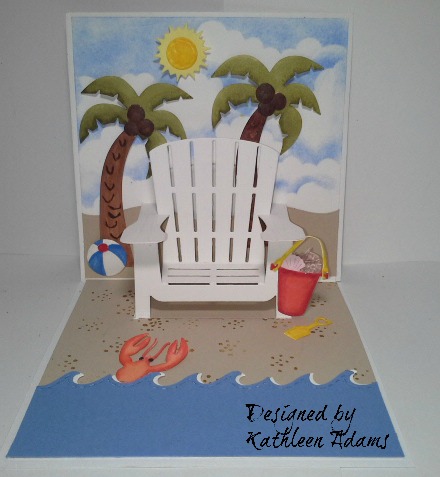
It’s a new month and a new Hostess who is Nicky Foden.  Because today is Sandcastle Day, Nicky has challenged us to put a sandcastle, sand or any beach theme.  One of my favorite die sets is Karen Burniston’s Adirondack Chair Pop Up.  The one I own is one she designed when she was with Elizabeth Craft Designs.   She has revisited this set at her new site:  https://karenburniston.com/adirondack-chair-pop-up/

The Steps:

Step 1:  Karen has an assembly video for this die set.  Click on the link above and you will find two videos.  One is for the original look of the Adirondack and a second one to make the chair look upholstered!  So the first thing I do for a pop up card, is to master the pop mechanism.  No worries, this one is easy!  I cut the “chair” pop up from white base weight cardstock or 80lb.  I use a heavy cardstock because I assume it’s going to be opened a closed a lot!

Step 2:  My base card is a 5.75″ square when folded.  This is the card that you will cut the chair into the fold.  Depending on what you will use for inside mats you may want to cut the two mats with the chair.  I chose for the bottom (under the chair” side) I measured  where I needed to out sort of a square under the chair.  And then to cover that hole when I attached the “sand” mat, I just adhered the same color cardstock under the chair and adhered the larger mat on top.  Both the “sky” layer or as I’m calling mats, measure 5.5″ square.

Step 3:  Cut two 5.5″ squares from white cardstock.  Using Elizabeth Craft Designs: “Earth and Sky”   I stenciled clouds with Aqua Marine Blue PanPastel.  Adhere this sky background mat to the top inside of the base card. The second one you will use on the front of the card.

Step 4:  Using Karen Burniston’s1038 – Tropical Scene

Tropical Scene

I cut the “waves” in white and blue for both the bottom inside and the front of the card.  I also cut the “Palm tree/sand dunes and “sea shells” and “sun” from this same set above.  I cut the little sand mound pc. twice. Once with the light brown cardstock and once with white cardstock.  I colored the little palm trees with Copic Markers.  Then I cut them off and adhered them to the light brown one right over the light brown trees.

Note:  This is a personal endorsement.  I do not receive any income from this company in either currency or products.  I have always felt that Karen almost always,  includes little decorator dies that you can use for so many projects with or without the die set they come with.  I’ve used these little sea shells and sun a lot.  For this project I used them on the front, inside, and in the bucket on the inside.

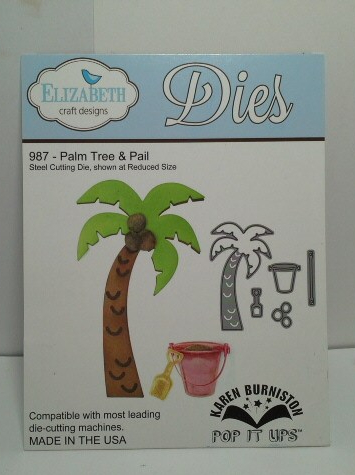
Step 5:  The two “Palm Trees” and “Pail” on the inside is from a discontinued die set from Karen B. that is called:  Palm Tree & Pail”.  I love this palm tree.

Palm Tree and Pail

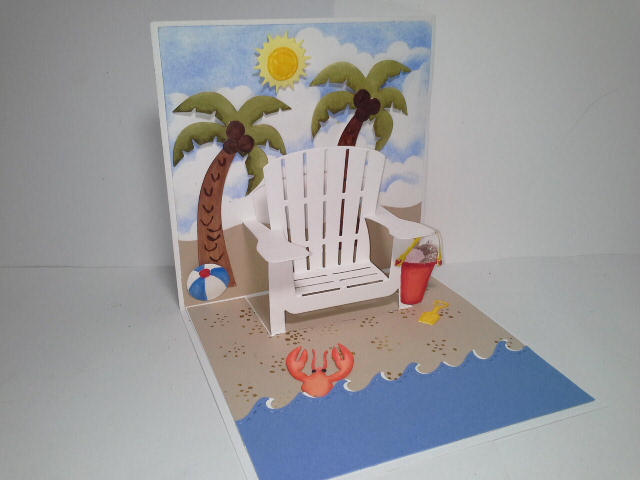
Step 6:  Now just adhere all your cut and/or colored as shown on the inside and the front.  (I also created a personal sentiment on my computer and printed out on white cardstock.  I cut it out with a nested die set set and adhered it to the bottom of the inside of the card centered on the lower inside over the “wave section”.  I took the pictures before I added it to the card because it has the “receiver’s name on it.”  I don’t have her permission to post it on the internet.  Here’s another quick look:

Inside seaside H2O

Side view seaside

Front seaside H2O

Thanks so much for taking a look!  I know you’re time is precious.   Here’s the link to the challenge blog to see the rest of the design team’s cards for inspiration.  We can’t wait to see yours!  Crazy 4 Challenges

Other Products Used:

Michael’s Craft Store:  All cardstock

Sizzix Big Shot Plus

CutterPillar Pro

Elizabeth Craft Designs:  Clear Double Sided Adhesive 10mm

Beacon’s Kid’s Choice Glue
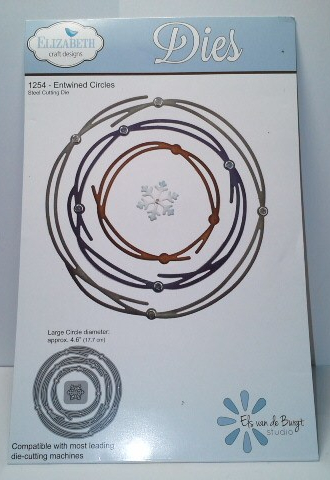
Sometimes the paper talks to you!

July Sketch H2O (2)

It’s sketch week!  I love sketch week!  I was a little stumped at first.  I decided to go through my paper stash, hoping for an idea.  Then I stumbled on a paper pack that I bought a couple of years back at the Scrapbook Expo.

simple-stories-paper.jpg

This paper pack from Simple Stories contains 24 double sided 6 x 6″ papers.  I decided to use it because it’s already filled with color coordinated paper!  So this week the paper itself created the IDEA!  It also made it easy and fastMy two favorite things!

The Steps:

Step 1:  I chose the sort of Chevron stripe paper for the backing paper.  I trimmed 1/8″ off of all 4 sides so there would be a 1/8″ white border when this layer is adhered to the base card. I cut the smaller 3 squares with the red polka dot and the navy polka dot from this pack, and cut the blue from solid light blue cardstock so the sentiment would stand out.  I used Elizabeth Craft Designs: 1118 – Stitched Squaress

2017-07-23 16.40.23

I used the 5th die from smallest or the largest.  It’s a 9 die set.

Step 2:  Make a base card by cutting a 12 x 12 pc. of white cardstock in half.  Score one half at 6″.  Fold over for a “tent fold” card.  Then adhere the backing layer and 3 squares as shown:

July Sketch H2O (2)

Step 3:  I used this set of word dies from Diamond Press for the “Hello”:

2018-07-23-14-20-55.jpg

I cut it 4 times: navy, white, red and yellow cardstock.  I offset them all together just a little.  Then adhered the sentiment on top of the squares.  I KNOW!  3 STEPS AND YOUR DONE!

I love you all that took the time to stop by.  I hope you will give this months sketch a try!

Other Products Used:

Elizabeth Craft Designs: Clear Double Sided Adhesive 10mm

Michael’s Craft Store:  All solid color cardstock

Sizzix Big Shot Plus

CutterPillar Pro

For Unconditional Love…

May sketch h2o (2)

May sketch inside

It’s sketch week!

I usually like to show the sketch but for some reason I was unable to cut and paste.  However, here is the link to the blog:  Crazy4Challenges

My granddaughter runs a kitten rescue called “The Kitten Stage”, so I made this in honor of what she does.

The Steps:

Step 1:  To make the “two triangles” base, I used a double sided card stock from LawnFawn.

Step 2:  I used Elizabeth Craft Designs:  1116 – Stitched Circles.

Stitched Circles

Using white card stock, cut two circles using the second to the smallest die in the set above.  I then created the front sentiment on my computer and cut it out with the third to the smallest in the same set.

Step 3:  I used these two die sets from Frantic Stamper for the little dog and cat.  I cut them from white card stock and colored them a bit with Copic Markers.  Then I adhered them to the two smallest circles.

Frantic Stamper dies

Step 4:  The card measures 5.5″ x 5.5″.  So score a 11″ x 8.5″ at 5.5″.  (First, create the inside sentiment on your computer and print out on white card stock for the base) Fold over and trim to a 5.5″ square.  This is the step that using a double sided card stock is great.  I just cut a 5.5″ square and cut it in half on the diagonal.  Then I just flipped one to the other side for a perfect two triangle base.  Adhere the two triangles to the white base card and add the 3 circles as shown.  I added a bakers twine bow.

That’s It! Here’s one more look:

May sketch h2o (2)

May sketch inside

Thanks so much for taking a look.  This is an easy sketch, so jump in there and show us what you got!  Here’s the link:  Crazy4Challenges